
Easy, straightforward and can be performed by anyone with a basic understanding of production systems (read: basic). But, my advice IF (<- big if) you want to use these steps on your infrastructure, adapt them to your needs.
At the very least you’ll have a place to start without having to spend countless hours, doing research… drinking more than what anyone would consider a healthy amount of coffee. And/or having to work out what articles out there are compatible with what or which aren’t.
Tech writers need to start specifying software versions on their articles to prevent this from happening.
I’ve written other articles about how to streamline the deployment for VMs using virtualization platforms such as Proxmox and automation tools like Ansible.
This step-by-step can and will deal with some of these technologies without too much customization. You could also adapt it to use some other alternatives to the tools used here.
Enough preamble, let’s go for it.
Step 1: Get some hardware
Take your pick. Whether it’s a very low-cost decommissioned desktop PC from an office or a laptop with a broken screen.
You can get a lot of good deals on ebay for decommissioned hardware, either tower PCs or “old” servers.
Or a US$ 20,000 latest-generation server with the latest and greatest hardware.
It’s your call. I can’t determine how much load will your platform have but these steps should help you choose. So, please, adapt it to your needs.
Step 2: Let’s set up a Cloud-ish environment.
Let’s say you don’t have a lot of bare-metal machines or, maybe, you do. In my case I’ve had an issue with the bare-metal servers I have available to me. They’re too big.
Note: Yes, I know, this example can be set up with virsh. This is how I decided to do it, there’s a million ways to do it, this one’s easier for me :)
As in, 512 Gigs of RAM each. Now, Kubernetes’ workloads don’t usually go well with huge servers, there’s a pod limit to each node. Kernel limitations won’t help either. So I’ve decided to go with a Proxmox cluster environment that will host a few VMs with different VM models on it.
This is how the Proxmox deployment will look like after it’s done:
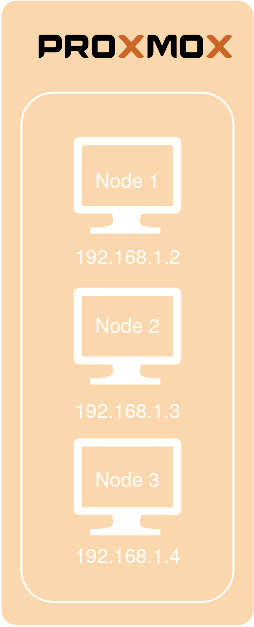
This example uses a 3 node Proxmox cluster. The setup for the cluster just needs you to install 3 machines with Proxmox, it can be Proxmox 5 or 6, your call. It makes no difference.
After you have installed the Proxmox distro on the machines, just create a cluster.
Create the Proxmox Cluster
In this example I’m going to reserve the following IPs for the installation (they’re also stated on the image above):
192.168.1.2 node1
192.168.1.3 node2
192.168.1.4 node3
The cluster creation is pretty well documented on Proxmox’s documentation here. On the newer versions, it can also be done with the GUI. I’m proceeding with the installation on Proxmox 6.1.
These steps should create a cluster pretty painlessly, let’s name it cloudish. Just log in via SSH to any of the nodes, in this case node1, and execute the following command:
node1:~# pvecm create cloudish
Then login into the other nodes and run the join command on each one of them:
node2:~# pvecm add 192.168.1.2
node3:~# pvecm add 192.168.1.2
The pvecm command will ask you for the node1 credentials, input them and you’re good to go.
Step 3: Create a bare-metal controller
To control and deploy the nodes I’m using MaaS (Metal as a Service), a bare metal controller that allows you to present the VMs you are going to create, or even bare metal servers to a cloud orchestrator such as Terraform or JuJu.
MaaS uses two elements:
- A region Controller that handles: DNS, NTP, Syslog, and Squid Proxy
- A rack Controller that handles: PXE, IPMI, NTP, TFTP, iSCSI, DHCP
Both of these elements can be deployed to the same machine.
In case you want/need high availability these components can be separated and installed in different machines, it’s well documented and straightforward, more info here.
In our case, we’re going to use the same machine for both things.
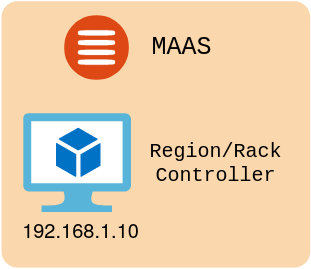
The deployment will look like this:
Download an Ubuntu Server ISO from the Ubuntu website and install it on a VM created on the Proxmox cluster, in this case, Ubuntu 18.04 LTS.
The bare minimum MaaS deployment needs one machine with 1 core and 2 Gigs of RAM. This should suffice for a very small deployment with a couple of machines.
Lets amp that up and go all the way to 4 cores and 8 Gigs of RAM!
For this example the MaaS machine will have the following IP:
MaaS --- 192.168.1.10
After you’ve installed the OS on the VM, go ahead and install the MaaS Controller, in our case MaaS 2.6.2:
maas:~# sudo add-apt-repository ppa:maas/2.6
maas:~# sudo apt update
maas:~# sudo apt install maas
maas:~# sudo maas init
After the initialization is done you’ll see a URL on the terminal. Go ahead and log into it using your favorite browser and finally, proceed with the configuration stage. Read more here.
Please remember to set up your DHCP service, by going on the MaaS interface and setting up the range you want.
To use MaaS DHCP you need it to be the only DHCP service on the network. This is very important. Also, reserve the ranges for the IPs you’re going to use elsewhere or the ones you’ve already used.
Step 4: Create VMs.
Yes, create Virtual Machines for Proxmox, a lot of them. I advise going with a for loop on the terminal using qm create so the process doesn’t get tedious, remember to check what requirements you need.
For this project, we’re going to create the bare minimum that Canonical recommends for a charmed Kubernetes deployment with HA, 10 machines.
Also the 3 VMs for JuJu.
The setup is as follows:
VM1    2 CPU Cores | 2 GB RAM | 20 GB HDD   tags=master
VM2    2 CPU Cores | 2 GB RAM | 20 GB HDD   tags=master
VM3    2 CPU Cores | 2 GB RAM | 20 GB HDD   tags=loadbalancer
VM4    2 CPU Cores | 2 GB RAM | 20 GB HDD   tags=easyrsa
VM5    2 CPU Cores | 2 GB RAM | 20 GB HDD   tags=etcd
VM6    2 CPU Cores | 2 GB RAM | 20 GB HDD   tags=etcd
VM7    2 CPU Cores | 2 GB RAM | 20 GB HDD   tags=etcd
VM8    4 CPU Cores | 4 GB RAM | 20 GB HDD   tags=worker
VM9    4 CPU Cores | 4 GB RAM | 20 GB HDD   tags=worker
VM10   4 CPU Cores | 4 GB RAM | 20 GB HDD   tags=worker
VM11   1 CPU Cores | 3 GB RAM | 20 GB HDD   tags=juju-controller
VM12   1 CPU Cores | 3 GB RAM | 20 GB HDD   tags=juju-controller
VM13   1 CPU Cores | 3 GB RAM | 20 GB HDD   tags=juju-controller
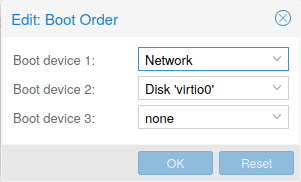
After you create the VMs you need to add them to MaaS, make sure they’re set up for Network boot first and HDD second, like this:
Then boot them up so they go through the process to be added to MaaS.
Step 5: Configure MaaS
For MaaS to be able to control Proxmox VMs like if they were a bare-metal machine it needs a driver.
Luckily a guy by the name of Wojtek Rakoniewski wrote one for all of us to use and posted it on launchpad. It works with what I’ve tested: Proxmox 5.1, 6.1 and everything in between since it uses the Proxmox API.
I’ve taken the liberty of hosting it on a public Github repo with credits for him all around, just in case the guys from launchpad decide to archive the bug tracker.
You can download it here.
Or using wget:
wget https://raw.githubusercontent.com/galdorork/proxmox-maas/master/proxmox.py
After you download it you need to put the file on this route on the MaaS Region controller:
/usr/lib/python3/dist-packages/provisioningserver/drivers/power/
And register the driver on the registry.py located here:
/usr/lib/python3/dist-packages/provisioningserver/drivers/power/registry.py
You need to edit the entry so it looks like this:
## Add this to the import headers
from provisioningserver.drivers.power.proxmox import ProxmoxPowerDriver
## The ProxmoxPowerDriver is the entry to be added
power_drivers = [
     ProxmoxPowerDriver(),
     ...
 ]
 ```
Then install the *proxmoxer* python package so the driver knows what to use when talking to the Proxmox API:
```bash
apt install python3-proxmoxer
Finally, restart the maas-regiond service to take the changes into account, systemctl restart maas-regiond should work.
Unfortunately even using this driver MaaS doesn’t know how to auto-detect the hardware controller for the machine, but it’s easily done manually on the VM’s config.
To do this you need to create a PVE user on the Proxmox GUI that has the VM.Audit and VM.PowerMgmt permissions.
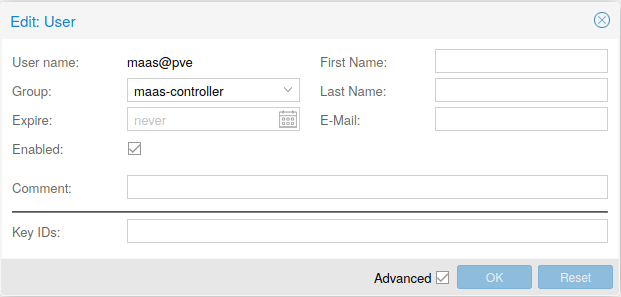
![]()
Then configure the VM on MaaS so the region controller knows how to use it’s power capabilities.
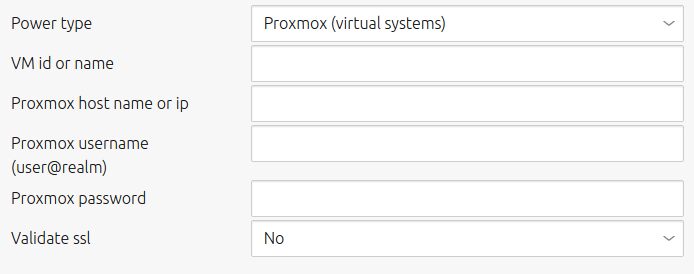
Input here the PVE user you have created, it’s password, one of the proxmox nodes’ IPs and the VM id.
Step 6: Commission the VMs
MaaS uses with this workflow:
The machine is added →Machine needs to be commissioned → Machine is deployed.
The workflow makes sense since no machine can be formatted or deployed accidentally by being present on the same network and being pxe-booted.
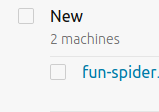
When you boot up your proxmox VMs the first time, they will be added to MaaS as new machines:
Then you need to commission them, this means it gets booted from MaaS (remember to configure the power type) and some tests are run on the machine, as well as defining an inventory for that specific machine, parsing CPU info, RAM info, Storage info, etc.
After it’s commissioned it’ll be shown as ready:

This means the VM is ready to be used by either a controller or being manually deployed by either using the MaaS GUI or the MaaS API or, maybe even JuJu.
Let’s go for JuJu.
DO NOT FORGET: JuJu needs “tags” to identify MaaS nodes, else it grabs them at random, please set up tags with the VM usage so you can use them as constraints later on:

Step 7: Create your JuJu controller VMs.
This implementation requires a JuJu controller. For this example, we’re going to use `2.7.1-eoan-amd64.`
We’re going to use a single machine for it. The VM needs at least 1 core and 3 GB of RAM.
You don’t need to install it, just set it up to boot from Network and the VM will boot up using iPXE.
After it boots with the Ubuntu image it will download some of the packages it needs to check the resources the VM has and show it to the MaaS controller.
Afterward, commission it and you’re all set, you can commission your first machine from JuJu. This will be done from your PC.
On your PC, execute the following command:
yourawesomelaptop:~$ sudo snap install juju --classic
Now, add the MaaS cloud to your JuJu environment:
yourawesomelaptop:~$ juju add-cloud --local
The output will be as follows:
Cloud Types
  lxd
  maas
  manual
  openstack
  vsphere
Select cloud type: maas
Enter a name for your maas cloud: my-amazing-bare-metal-cloud
Enter the API endpoint url: http://192.168.1.10:5240/MAAS
Cloud "my-amazing-bare-metal-cloud" successfully added
You will need to add credentials for this cloud (juju add-credential my-amazing-bare-metal-cloud)
before creating a controller (juju bootstrap my-amazing-bare-metal-cloud).
Your JuJu installation needs to be able to connect to the API, it has the URL, now it needs the credentials:
yourawesomelaptop:~$ juju add-credential maas-cloud
It’ll ask for the MaaS secret, get it from the MaaS GUI. Click on your username on the top right corner and it’s the first field, copy and paste when it asks for maas-oauth:
Enter credential name: my-amazing-bare-metal-cloud-credentials
Using auth-type "oauth1".
Enter maas-oauth:
Credentials added for cloud my-amazing-bare-metal-cloud.
You can check the added credentials with:
yourawesomelaptop:~$ juju credentials --local
And finally create the main JuJu controller, using the JuJu tags and constraints:
yourawesomelaptop:~$ juju bootstrap --bootstrap-constraints tags=juju-controller my-amazing-bare-metal-cloud maas-controller
You’re done with JuJu for now.
If you want High Availability you can scale the controller and let it have more machines, 3 is advised for any production environment (remember to create the VMs first on Proxmox) for this example we’re doing it:
yourawesomelaptop:~$ juju enable-ha
Step 8: JuJu the hell out of that MaaS instance
Once the empty VMs are ready, the MaaS controllers are ready and the JuJu controller is ready you’re all set.
You can even do these steps on a nice graphical interface using JuJu Gui. Don’t worry, you can still use the terminal to adjust some of it, or even customize the charm bundle so it adapts to your machines.

In this case, we’re going to edit some of the constraints, so next to where it says `untitled-model` you can click on export and download the YAML descriptor file. On this file you need to focus on the machine descriptors at the end of the file and add the constraints to each one, depending on their need. E.g:
machines:
  '0':
    constraints: tags=easyrsa
  '1':
    constraints: tags=etcd
  '2':
    constraints: tags=etcd
  '3':
    constraints: tags=etcd
  '4':
    constraints: tags=loadbalancer
  '5':
    constraints: tags=master
  '6':
    constraints: tags=master
  '7':
    constraints: tags=worker
  '8':
    constraints: tags=worker
  '9':
    constraints: tags=worker
Make sure the machine IDs match with the descriptions present at the beginning of each service definition. Then import it to your GUI and let it process.
Then commit the changes. You should add your `ssh` public key on this step. Remember you can always add it later on.
Then relax, get a cup of coffee, or tea, or a beer, maybe all of them. Depending on the hardware you have available this could take a while, from 15 mins on. In the meantime, you can see the deployment status on the GUI.
If you decide to use the terminal the bundle can also be deployed like this:
yourawesomelaptop:~$ juju deploy myawesomekubernetescluster.yaml
Step 9: Get your Kubernetes config file
After the provisioning is done you just need to get your Kubernetes config file from the juju deployment:
yourawesomelaptop:~$ juju scp kubernetes-master/0:config ~/.kube/config
And connect to the deployment using kubectl, in case you need to install kubectl on your machine I’ve written an article about it here, it has instructions for the main OSs out there.
There, you’re all set.
Optionally you can set up MetalLB as a way to expose the services or even use nfs-client provisioner or whichever persistent storage you might want to use.
Step 10: Scale it away
Yes, this platform can be scaled vertically, using more VMs present on MaaS for this task.
From JuJu you can extend each of the cluster roles from your choosing, an example for a Kubernetes worker would be:
juju add-unit kubernetes-worker
Scale it A LOT? (take caution, this will add 16 worker nodes):
juju add-unit kubernetes-worker -n 16
Or scale it down (removing the second worker):
juju remove-unit kubernetes-worker/2
The same applies to all of the other cluster roles.
Et voilá, it’s all set up, now you can focus on developing the next million-dollar idea without having to worry about the platform you have, and without paying premiums on cloud platforms that can be replicated on-site or maybe use hardware you already have laying around.
If you’re going to use this article as a base to deploy your own PaaS solution, don’t forget that it can be extended a lot, using JuJu for vertical scaling as well as Kubernetes autoscaling for horizontal scaling (pod replica scaling).
If you need any extra help you can get in touch with me using the comments on this article.