Disclaimer: Following the Official Proxmox documentation of course :p
When retiring a Proxmox cluster node from a cluster you need to take into account several things.
Not very often you find yourself with the opportunity to retire a server and install a new one. Especially a new, shiny one with all the best bells and whistles a provider can give. Or you can find yourself finding that a node has broken down and it’s not worth it to fix it, might as well replace it.
In case one of these machines belongs on a Proxmox Cluster you need to retire it. Leaving it presented on the cluster might cause a ton of issues we won’t go into on this article, trust me, Murphy’s law applies.
Is the proxmox node on?
If the Proxmox Node is online you need to migrate all the Virtual Machines (VMs) to another Node. Since Proxmox 5 migrating VMs has never been easier. You can just right click and click on Migrate, wether it has local or shared storage is transparent for the operator/sysadmin/you.
After the migration finishes (in the case that you don’t use shared storage and you use local storage this might take a while) you can proceed to shutoff the node.
Non-recoverable hardware failures on nodes don’t need to go through this step. There are ways to recover the VMs if the storage was locally based but, due to time constrains I won’t cover it here.
Make sure the node is no longer on
When the node has been shutdown DO NOT START IT UP AGAIN. This will cause problems with the corosync services. Preferably unplug the network connection, either physically or through the OS configuration.
Verify it!
In the case described on this post we’re using a 9 node cluster, something like this:

You need to check the Node name from the Proxmox Custer Manager CLI, this is as easy as opening an SSH console or going through the Proxmox GUI -> Shell and issuing the command:
pvecm nodes
It should give you an output like this:
Membership information
----------------------
    Nodeid      Votes Name
         9          1 proxmox9
         8          1 proxmox8
         3          1 proxmox3
         4          1 proxmox4
         7          1 proxmox7
         6          1 proxmox6
         5          1 proxmox5
         1          1 proxmox1 (local)
         2          1 proxmox2
Get down to it, and get the node down too
Let’s say we want to remove the node with id 2 (proxmox2). Ensure you’ve shut it off and issue the command:
pvecm delnode proxmox2
There won’t be any output to this command unless something goes wrong. What this command does is remove all of the configuration files from the pve file system that control the cluster. It does NOT, however, completely clean all of the corosync entries, hence the “If it’s out, it stays out”, the cluster will basically look like this afterwards:
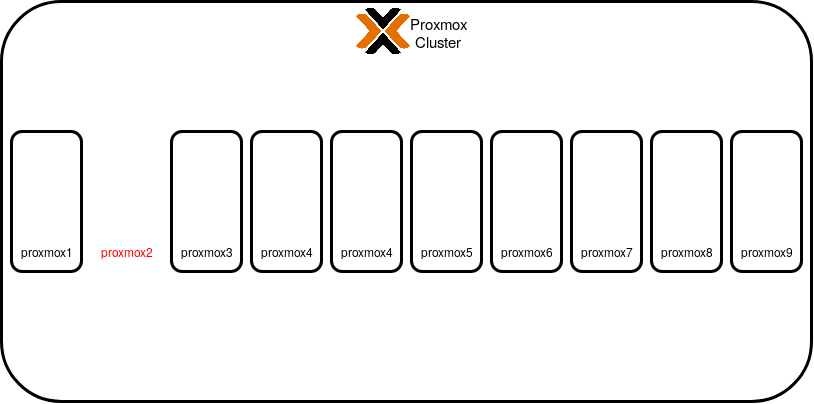
Et voilá!
You’ve succesfully removed a Proxmox Node from a running cluster and with zero (hopefully) downtime on the VMs themselves.
Now go and add a brand new shiny machine to the Cluster. Maybe a few more than one!
If you want to check out how to create a Production-Ready Proxmox Cluster or maybe adapt your current deployment to the different approaches we’ve explored deploying Production Proxmox clusters between all of us here at Vectops you might want to check the upcoming series about it.